|
链接: http://pan.baidu.com/s/1qYVCYss 密码: cibq
10 Classes Project Files Included MP4
Title: FXPHD – VRY302 Photorealism in VRAY for maya
Info:
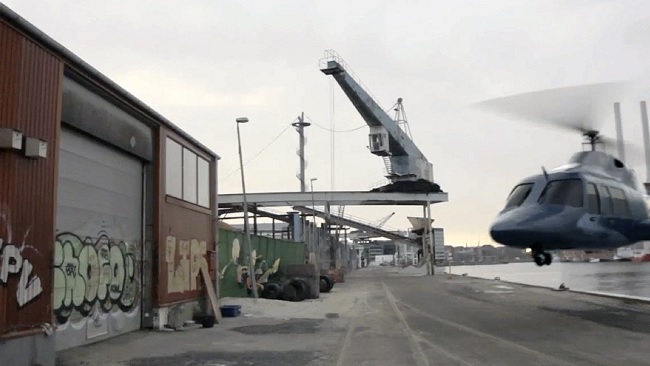
This course focuses on using vray for maya to create a photo realistic scene from a-z. We start by covering set work, making sure our reference, hdri and other details are in perfect order, so we can create a perfect match in maya when we get back to the office. From here, it’s all about shading, lighting, details and more details, before moving into comping the shot, fixing the plate, shooting extra element plates on gopro cameras, and finally delivering the shot.
You will be guided through this by freelance vfx artist Peter Hartwig, who has worked on films, tv and commercials all over the world, at places such as Ghost, Framestore and MPC.
CLASS 1
Intro: we have a look at what it is we will be doing. We have a look at the plates, the model and brief. The important part of the lesson is getting everything set up and ready for action, with a clear goal in mind.
CLASS 2
On set work. What was covered when shooting. Calibrating the plates and putting together the hdri image that we will be using. We look at getting the environment standin built, and using the hdri to texture this. At the end of the lesson, we have an environment set up and ready to go.
CLASS 3
First off there is a quick introduction to de-lensing the plates, and getting them tracked, including a workflow for re-applying the lens distortion. It’s then time to render a nice grey helicopter in the shot to see that all is working as we expect it to.
CLASS 4
With all that in place, it’s time to start making the chopper look real! Step one is getting a decent metal material in there, and getting our bump and displacements working.
CLASS 5
Next step in shading the helicopter is to get basic colors on there, as well working on speculars and reflections, which will really sell the shot. After this lesson, the helicopter should feel like it is actually in the shot!
CLASS 6
Time for color. We start adding color and decals to the bird. This will involve going back to our spec and bump maps, making sure we can ‘feel’ the difference in surface qualities.
CLASS 7
Dirty her up. We add weathering, wear and tear. This also includes scratches, exhaust burns, dust and other good forces of nature that has played a part in the helicopters life. We are now entering realism!
CLASS 8
Peter was once told by a supervisor on a show he worked on: “now it looks real… go ahead and make it look good”. This is what we do now. Add kick lights, bounces, and everything else we can come up with.
CLASS 9
We do a comp of the shot now, and figure out what plates we need to add in there to really sell it. We then shoot those in the studio and comp them in! This could also include rendering out particles for exhaust pipes and other details.
CLASS 10
Finishing the shot! Get the last elements in there. Touch up the plate. Camera shake. Grain. etc… they are all our friends!
10类项目文件包括MP4
标题︰数码— —玛雅VRAY的VRY302超写实
信息︰
本课程主要讲述如何使用vray的玛雅人从a 到 z创建场景真实感的一个照片。我们开始通过覆盖的设置工作,确保我们的参考,hdri和其他细节的井井有条,这样我们就可以创建完美的搭配,在玛雅人当我们回到办公室。从这里,它是所有关于遮光、照明、和更多的细节,才能进入野营的一个镜头,固定板,射击的额外元素板gopro相机上和最后交付射击。
你将指导,通过这自由职业者的视觉特效艺术家彼得 ·哈特维希 ·,曾在电影、电视、广告世界各地,在鬼、Framestore和MPC等地方。
1类
简介︰我们看一下我们要做的是什么。我们看看板、模型和简介。这一课的重要组成部分也得到了建立并准备采取行动,与明确的目标。
2班
关于设置工作。什么被覆盖在拍摄的时候。标定板和放在一起我们将使用hdri图像。我们看看环境,站建成,越来越使用hdri贴图这。在本课末尾,我们有设置好,去一个环境。
3类
第一次过去便是消除透镜板,并让他们跟踪,包括重新应用镜头畸变的工作流的快速入门。然后是时间来呈现不错的灰色直升机镜头来看,一切正如我们所料。
4班
与所有的地方,它是时候开始制作的斩波器看起来是真的!第一步是你得到体面的金属材料在那里,还是我们的凹凸和位移工作。
第五类
下一步在这架直升机是要到达那儿,基本颜色以及工作在speculars上的底纹和真的会卖枪的思考。经过这次教训,这架直升机应该感觉实际上是在射击!
6班
颜色的时间。我们开始添加颜色和贴花的鸟。这将涉及回到我们规范和凹凸的地图,确保我们可以感到,表面质量的差异。
7类
弄脏她。我们添加风化、磨损和撕裂。这也包括划痕、排气烧伤、灰尘和其他好自然力量的直升机生活中所发挥的一部分。我们现在正进入现实主义!
第八课
彼得一次得知上级对他工作显示:"现在它看起来真实...吧,让它看起来很好"。这是我们现在做什么。添加踢灯,反弹,和一切我们可以一起。
9班
我们现在,做射击comp,找出我们需要在那里把它添加什么板。拍那些在工作室里,然后comp在他们!这还可能包括呈现出粒子排气管和其他详细信息。
10班
完成拍摄!在那里获取的最后一个元素。触摸板。相机的抖动。粮食。等等......他们都是我们的朋友! |
本站首发,永久链接: https://www.yipinsucai.com/thread-109085-1-1.html
|


